Upgrading the CarPlay function in your Toyota RAV4 can seem daunting, but with the right tools and instructions, you can do it yourself. Follow these comprehensive steps to enjoy a seamless CarPlay experience in your vehicle.
Step 1: Preparing for the Upgrade
First, make sure you have all the necessary tools and components for the installation. You'll need:
- Pry tool
- Size 10 socket screwdriver
- Philips screwdriver
- The CarPlay module and provided components (ribbon cable, copper pillars, power cable, metal backplate)
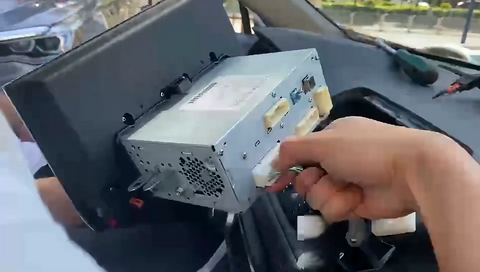
Step 2: Removing the Original Main Unit
- Open the Top Cover: Use a pry tool to gently open the top cover of the main unit.
- Remove Screws: Using a size 10 socket screwdriver, remove the four screws securing the main unit.
- Detach the Screen: Grasp both sides of the screen and pull it outward carefully. Disconnect all the plugs at the back of the main unit.
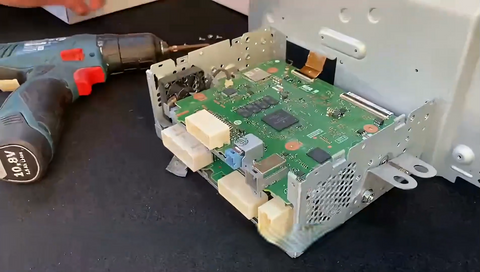
Step 3: Disassembling the Main Unit
- Remove Components: Remove all components from the product packaging.
- Remove Screws: Use a Philips screwdriver to sequentially remove the screws from the main unit.
- Open the Back Cover: Use a pry tool to carefully open the back cover from the edges.
Step 4: Accessing the Inner Components
- Remove Screws Again: Use a Philips screwdriver to remove the screws securing the inner side of the main unit cover.
- Lift the Main Unit: Position the pry tool against the clips and gently lift the main unit. Be careful not to pull hard and be cautious with the ribbon cables.
Step 5: Installing the CarPlay Module
- Remove Inner Screws: Remove three screws securing the inner side of the main unit cover.
- Tap the Main Unit Cover: Lightly tap to release the cover and remove the four screws from the original main board.
- Install Copper Pillars: Take out the four copper pillars provided and lock them onto the original main board in sequence.
- Remove Original Ribbon Cable: Lift the clip upwards and remove the original vehicle's ribbon cable.
- Insert New Ribbon Cable: Take the ribbon cable provided, insert it into the clip's slot on the original main board.
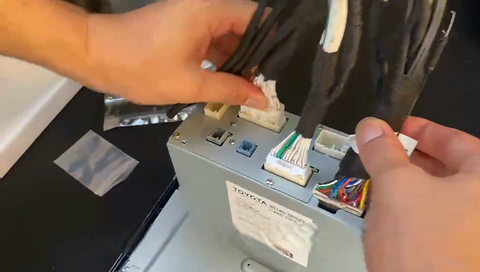
Step 6: Securing the CarPlay Module
- Connect Ribbon Cable to Module: Insert the ribbon cable into the bottom of the CarPlay module, ensuring the clip is properly aligned and fully engaged.
- Secure Module: Center the CarPlay module inside the main unit and lock it with four screws.
- Reconnect Ribbon Cable: Remove the original vehicle's ribbon cable. Make sure the M end goes to the main board and the P end goes to the screen.
Step 7: Reassembling the Main Unit
- Restore Original Cover: Put the original cover back in place.
- Install Metal Backplate: Take out the provided metal backplate and lock the screws back in.
- Reconnect Power Cable: Align the original vehicle power cable and connect it to the provided power cable.
Step 8: Final Steps and Testing
- Reinstall Main Unit: Reinstall the main unit back into the vehicle, securing all connections.
- Test the System: Start the car to test the installation. Press and hold the steering wheel's next track button for three seconds to switch systems.
And that's it! You've successfully upgraded your Toyota RAV4 with CarPlay. If you have any issues or need further guidance, check out AutoUpgradeClub.com for more tips and professional services to enhance your car's features. Happy driving!
Scumaxcon Wireless CarPlay Decoder Module Screen Mirroring For 2021 Toyota Corolla Levin Rong Fang Yaris CHR Yize:https://autoupgradeclub.com/products/scumaxcon-wireless-carplay-decoder-module-screen-mirroring-for-2021-toyota-corolla-levin-rong-fang-yaris-chr-yize